|
Care of...
Planning for better care of your collection means having knowledge about how materials are constructed and how they degrade. This helps you devise methods of care that reduce damage over time. In April we will offer four online courses that give in-depth information on materials, their degradation and their care. Care includes how to handle, store and exhibit them.
Photographs
by Gawain Weaver
Photographs are among the most common objects in modern society. But think for a moment how you care for photos. Are your personal snapshots - the photographic record of your family's history - kept in acid-free portfolios stored in climate-controlled rooms? Probably not. Unfortunately, that's often the case with photographs held by museums, archives, and libraries, too.
But before delving into how photographs should be stored, we must begin with photographic technology. Anyone who is responsible for photographic collections should know what photographs are, how to identify specific processes and the materials used to construct prints. This foundation provides a broader, deeper understanding of how photographs age, how to combat aging, and the principles behind environmental and handling guidelines for photograph collections.
A photograph is not an image. Rather, it's an object that contains an image. It has layers of materials. We can speak generically about the structure of photographs using these terms: support, binder and final image material. Although the structure can be more complex, these three are a good place to start.
Understanding the various layers in a completed photograph and how they relate to each other is vital to caring for photographs.
Excerpt from MS 222: Care of Photographs
Archaeological Artifacts
by Diana Komejan
Conservation and archaeology enjoy a symbiotic relationship: without proper conservation, artifacts inevitably lose much of the valuable information sought be archaeologists.
Buried objects reach a sort of equilibrium underground and the process of deterioration slows. But once they're unearthed, the process accelerates. This course is designed to describe fundamental steps that archaeologists can take to preserve finds for later investigation.
This course covers:
- Planning and equipment
- Artifacts
- Wet, damp and dry environments and their impact on artifacts
- Care and packing
- Block lifts and other specialized excavation techniques.
The Conservation Manual for Northern Archaeologists makes it clear that archaeologists should consider preservation treatment long before they start to dig: "Many potentially damaging situations can be avoided by adequate planning for conservation prior to the excavation. Early planning will allow the archaeologists sufficient time to include conservation in their research design and budget, and to acquire the necessary conservation services and field supplies."
Excerpt from MS 215: Care of Archaeological Artifacts from Field to the Lab
Metals
by Helen Alten
The significant role of metal in human civilization incorporates threads of legend and folklore, philosophy and astronomy, alchemy, modern metallurgy and chemistry. Metals, either in pure form or combined with other metals, have produced an enormous variety of objects, including weapons, tools, machinery, decorative art objects and jewelry. Because of the huge range of uses for metals, objects containing metal, or fully made from metals, are all around us. They make up a large part of many collections housed in museums, galleries and some libraries.
Metals account for about two thirds of all the elements and about a quarter of the Earth's mass, but a lower percentage of its crust. Seawater contains trace amounts of metals, as do all living organisms and even dust particles in air.
Most metals occur in nature as one of the constituents in ores, which are rocks buried within the earth. Ores are combinations of a metal and a nonmetal, such as oxygen or sulfur. The chemical combination is the same as salt or corrosion products found on deteriorating metal objects. In fact, ores are the most stable form of most metals. Corrosion is the way metals return to their ore state. To be useful as aluminum cans, copper wire and steel beams, the ores are mined and metals separated out of their ores by heating the rock - a process known as smelting.
Excerpt from MS 223: Care of Metals
Leather and Skin
by Helen Alten
Skin is the flexible tissue enclosing the body of vertebrate animals. The skin provides a barrier against invasion by outside organisms and protects underlying tissues and organs from abrasion and other injury, and its pigments shield the body from the dangerous ultraviolet rays in sunlight. It also waterproofs the body, preventing excessive loss or gain of bodily moisture. It contains two main layers of cells: a thin outer layer, the epidermis, and a thicker inner layer, the dermis.
Leather is the skin or hide of animals cured by tanning to prevent decay and to impart flexibility and toughness. An animal hide or skin is treated chemically to make it more resistant to decomposition, particularly when wet. This process is called tanning. Tanning should improve or retain the skin's opacity, flexibility, strength, resistance to moisture, and, most important, defeat its tendency to rot. however, some tanning methods facilitate the entry of moisture (salt tanning) or add a food supply to the hide (brain tanning).
All tanning methods rely on some degree of splitting up the skin.
Excerpt from MS 224: Care of Leather and Skin Materials |

|
|
|
Welcome to the Collections Caretaker e-Newsletter from Northern States Conservation Center. This issue is devoted to using an organized, planned approach. The newsletter is designed to bring you timely and helpful content that is pertinent to situations we all encounter in our museum and archives work. Feel free to let us know what topics you would like to see featured in Collections Caretaker or even contribute an article.
|
|
|
5% off two or more courses
|
|
Developing Exhibitions
by Lin Nelson-Mayson
To transform a concept into an exhibition, take stock of your resources. Resources are the people, physical materials, money and space to develop the exhibition.
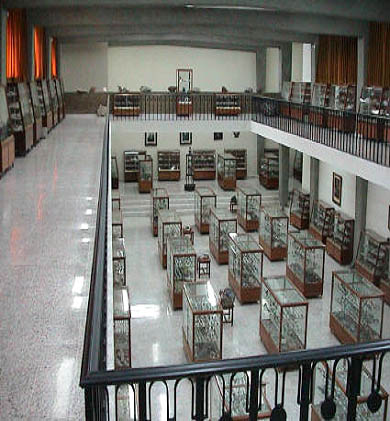 | | Consider gallery space and access paths to the space when planning an exhibition. |
PeopleStart with the people. Museum exhibitions are developed by dedicated and talented people who may be skilled in certain operations within the organization. Some of the jobs necessary to develop an exhibition include a scholar (curator), record keeper (registrar), fundraiser (development officer), teacher (educator), problem-solver (exhibition designer), skilled workers (preparators) and public relations. In large museums, there may be many specialized versions of these duties; in smaller museums, the same person may perform some or all of these tasks alone. The curator generally is the content specialist and develops the exhibition concept. The registrar arranges for loans of objects, prepares loan forms and organizes shipping arrangements. Registrars (with conservators if they are part of your staff) also conduct condition reports on objects as they arrive or are selected for the exhibition. Development officers research funding sources and write grant requests and other requests for funds and in-kind resources. Often the curator of the exhibition will work with the development officer to create a description of the proposed exhition for use in grant applications and speak with potential donors to the exhibition. The educator develops the interpretive goals and related programs. In some museums, educators also write the interpretive materials, such as text panels and program guides. The role of the exhibit designer has increased in importance in recent years. Using the goals of the exhition, the designer can physically present the objects and interpretive materials to their best effect. Preparators develop mounts for small objects, frame two-dimensional works, and do the installation of the exhitions. Finally, the public relations and marketing staff secure the visibility necessary to spread the word to the museum's members and community about the exhibition. For specific exhibitions, a museum might also need the skills of others such as a conservator, event planner, docent coordinator, object specialist, evaluator and others. ObjectsObject resources start with the objects central to the exhibition. some may come from the museum's collection. Some may have to be borrowed and the loan and shipping arranged for the duration of the exhibition. Objects may also be props to support the message of the exhibition or exhibit furniture created to enhance the message and present and secure the central objects to their best advantage (bases, vitrines, mounts, etc.) Objects also include the benches, comment books and audio-visual components used to complete the exhibition. As an exhibition plan is being developed, these items must be considered as part of the exhibition design. FundsUnless the museum has an endowment that provides exhibitions funds, once a budget is developed, the development officer seeks funds to pay for the exhibition. Funding for an exhibition comes from a wide range of sources. Federal and state grants; private, corporate and family foundation grants; fundraisers; private contributions; and in-kind donations compose the landscape of funding sources available for exhibition financing. The development officer will work with the curator and educator to identify good matches for the specific exhibition and construct a development plan, targeting the best matches for the exhibition's content, audience and educational goals. Should the exhibition be developed to travel, fees paid by the tour venues will offset some of the costs. However, the costs of shipping, crating and tour management must be added to the budget, often negating the income received through the tour. Touring exhibitions are a wonderful way to extend the life of the exhibition and provide increased visibility for the museum's efforts. Because they can sometimes be seen as a way to recoup expenses from the home museum's display, the tour budget needs to be carefully developed to ascertain if the additional costs of the tour (and the staff time to market and manage it) offset the anticipated income. SpaceThe gallery for the exhibition is only part of the space resources to be considered. Are the doors and elevators large enough to move the objects? If objects are borrowed for the exhibition, where will their crates be stored during the display? Will the path through the museum need additional signage to direct people to the exhibition? Will there be enough room for wheelchairs and strollers? When designing the exhibition, safety of people and objects are of primary importance. (Excerpt from MS 106: Exhibit Fundamentals: Ideas to Installation)
Lin Nelson-Mayson, with over 25 years of museum experience at small and large institutions, is director of the University of Minnesota's Goldstein Museum of Design. Prior to that, she was the director of ExhibitsUSA, a nonprofit exhibition touring organization that annually tours over 30 art and humanities exhibitions across the country. Ms. Nelson-Mayson has extensive experience with the planning, preparation, research and installation of exhibitions. Ms Nelson-Mayson's teaches MS 106: Exhibit Fundamentals: Ideas to Installation.
|
|
Planning for Mannequins
by Helen Alten
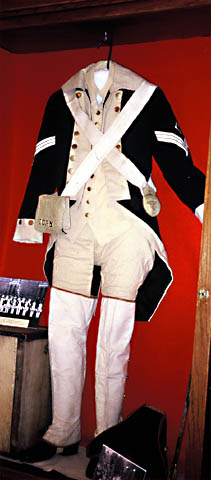 | | Costume displayed on padded hanger at the Adams Museum in Deadwood, South Dakota. |
Choosing a Mannequin Style
Before constructing a mannequin, you must decide on the look you desire. Do you need or want a full body form? Or is a torso adequate? Do you need a head and hands? Is realism important? Or is the mannequin merely a support for the costume, and should be as unobtrusive as possible? Are you creating a historical diorama? These are important questions for you to answer before you start measuring and cutting. Remember, the more realism you require, the more time must be devoted to making a mannequin for each costume. While a torso might take as little as 4 hours for an experienced mannequin maker to create, a realistic human figure can take more than two full-time weeks of work and may require more than one person.
The Padded Hanger
The simplest technique is the padded hanger. This can be a commercial hanger, padded out to provide some support to the garment. Or you can modify a commercial hanger (cutting off the hook and using fishing line to hang it). Testfabrics once sold quilted padded hanger torsos that could be modified with ruffles and other attachments. You can make your own custom padded hangers, which is how the Smithsonian's National Holocaust Museum hangs costumes. These have flat slotted metal hangers to which are attached quilted cotton body forms that pad out the hanging costumes.
The Flat Cut-Out
The flat cut-out is the next step towards realism. I've seen these made of wood, plexiglas (clear acrylic sheet), cardboard (acid-free), coroplast (corrugated plastic), metal, polyethylene foam plank (Ethafoam), and foamcor.
Generally, tailored garments do not look good on flat cut-out supports. The Rock and Roll Hall of Fame in Cleveland, Ohio displays fancy gowns on cut-out forms - making the gowns look ugly. The breasts aren't well supported and the gowns have stretched wider than they would have looked on the female singer who originally wore them. In this instance, the mannequin actively detracts from the display. Flat cut-outs work best if they are very narrow and then well padded out with polyethylene foam or polyester quilt batting - giving them a three-dimensional character.
Making two cut-outs and spacing them 3 to 4 inches (7.5 to 10 cm) apart, helps give a start to the three dimensional character. However, the shoulders and breast plate need to slope inwards, so the boards are only about 2 inches (5 cm) apart at the shoulders. An example of this mannequin was published in Museum Mannequins.
Sometimes flat cut-outs are hinged. This is like a full-size paper doll. I have seen these made of white cardboard as well as wood. The wood technique is fully described by Elmer Halvorson in AASLH Technical Leaflet 64. He finishes the body off with a papier mache torso, hands and head.
The Torso or Partial Form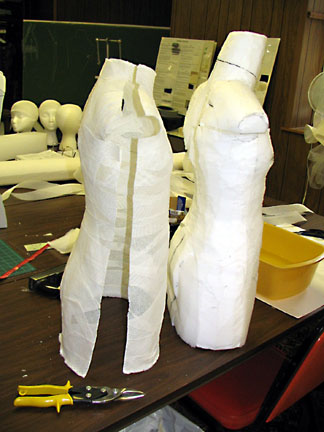 | | A buckram cast torso form (left) and Ethafoam carved torso form (right) sized for the same garment |
The torso or partial form is the next step towards realism. It is followed by the full body form. Here human creativity flourishes. Museum mannequins have been made by altering old department store mannequins, using dressmaker forms, casting from real people, casting from a form of the correct size, carving down from a block of foam, or building up from a block of foam or a frame work made of hinged wood (an advanced form of cut-out), or welded metal or metal mesh. For those with dress-making and pattern making experience, mannequins have been made by cutting and sewing or tying flat rigid materials to form hollow 3-dimensional bodice forms. Others have made life-size stuffed figures, expanding patterns used by doll-makers. These stuffed dolls may be constructed on a metal or wood stand, as in a pattern developed by an Indiana museum. Or they may be free-standing dolls, as seen in some of the Wisconsin Historical Society exhibits. Often they look like Cabbage Patch dolls on growth hormones and can be some of the most frightening mannequins in today's museums. With this diversity of techniques, there is an equal diversity of materials. Casting materials have included papier mache (usually using acidic papers - but better ones have used acid-free papers), paper packing tape, duct tape, plaster, polyester resin, silicone resin, buckram, and Bondo (polyester car body filler). Sewn torsos use metal screening, polyester screening (extremely large and fine), stiffened fabrics, and thin cardboard. Built up mannequins use a diversity of rigid support materials, including polyvinyl chloride plumbing pipes, copper tubing, steel rod, aluminum rod and tubing, wood, plywood, formed plexiglass, wire, and wood dowels. Carved out torsos are usually made from polyethylene foam, the best known brand is Ethafoam. However, a cheaper alternative might be styrofoam plank, which is readily available in most parts of the world. (It might produce stearic acid if heated up. However, tests I've had running for over 20 years have shown this material to be remarkably stable in real life conditions.) Planks can be vertical or horizontal. They can be cut using Denis Larouche's silhouette technique, Curtis Peacock's detailed sculpting technique, or cut using the disc technique published by many authors. Ethafoam doesn't require any adhesive - it melds together with hot air from a paint stripping hot air gun. (Your bathroom hair drier is not hot enough.) Styrofoam does require an adhesive. Commercial styrofoam adhesives are nasty - full of fumes that test acidic. Hot glue doesn't work that well on styrofoam - it usually peels off. But double stick tape might work for your purposes. Or bamboo skewers to hold pieces together. (Bamboo skewers are great when trying to hold pieces of foam together.)
Realism
Finally, there is realism. It can be suggested - as in paper hair or silver painted faces. Or it can mimic reality as much as possible. Here you need to be well aware of all details, because a slightly incorrect depiction is glaringly obvious to the museum visitor. Realism almost always requires casting from a real person. This means finding a person who looks like what you desire, who is willing to undergo the mental and physical torture of having face, hands and other body parts copied, and who will not balk on seeing their face in your exhibit. Or it requires the talents of an exceptional artist who can mold a face in clay or carve it out of a more rigid substance. Mannequin faces have been cast in polyester, plaster, a variety of modern art casting materials and wax. Colors have been tints in the wax or polyester and paints (applied with brush or spray gun). The creation of a realistic mannequin requires knowledge from theater props departments where casting and molding humans is more commonly practiced. And in the end, you might require a skilled artisan who can create magic.
What Effect Do You Desire?
So, as you think of your exhibit, think of what the overall desired effect should be. Do you want a basic support or a complicated realistic figure? Or something in between? Do you mind the headless horseman mannequin? Or are necks only necessary if you need a head to support a hat?
What Materials Do You Have?
Then think of the materials available to you. Do you have a ready supply of something that is acid-free or can be altered to become acid free? For example, wood can be covered in aluminum foil to block acids emitted by the wood as it ages.
You need to consider the length of use for the mannequin. PVC tubing may create hydrochloric acid as it ages. Perhaps you should use acrylonitrile butadiene styrene (ABS) plumbing tubes - they are dark gray and more inert - rather than the white PVC. For a short weekend exhibit, the use of dress forms draped in quilt batting and covered in cotton stockinette might be adequate. (We did this for a 3-day exhibit of First Lady gowns in Alaska.) But if the exhibit must be up for years, then be more careful about the materials you choose for the mannequins you make.
What Versatility Do You Need?
Also consider the costume. How will you put it on and take it off the mannequin in the least stressful manner? Do you need to build the mannequin so that it comes apart in sections? Often there is a break at the waist and shoulders. Arms can be inserted into sleeves before the garment is put onto the torso. How will the sections attach? Do you need a metal catch plate device because these areas must support a lot of weight? Is velcro sufficient? Do you need an internal rod?
How will the mannequin attach to the exhibit? Placing attachments can be tricky, especially on a fully clothed realistic mannequin, such as a man wearing a suit with shoes and pants. If the shoes are an exhibit prop, then they can be damaged. But if they aren't then you need to find a way to support the whole figure without putting holes into the costume and accessories. Will there be a back wall, a roof, a floor for you to use to stabilize the figure? Remember, most mannequins need support at more than one point. Otherwise you might get whipping or leaning.
As you can see, there are many considerations that go into building mannequins for your exhibits.
Excerpt from MS 243: Making Museum Quality Mannequins
Helen Alten is the director of Northern States Conservation Center and an objects conservator. She has been making mannequins for 25 years. She published three different mannequin forms in the book Museum Mannequins. She has taught mannequin making in Montana, Alaska, Illinois and on-line at www.museumclasses.org .
|
|
Northern States Conservation Center (NSCC) provides training, collection care, preservation and conservation treatment services. NSCC offers online museum studies classes
at www.museumclasses.org in Collections Management & Care, Museum Administration & Management, Exhibit Practices and Museum Facilities Management.
Sincerely, Helen Alten, Director
Brad Bredehoft, Sales and Technology Manager
|
|
|
|
|