Cleaning Kit 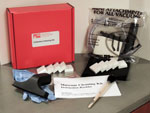
Cleaning Kit for basic collection care work using any canister vacuum, preferably a high filtration unit such as our Atrix vacuum cleaners. Ideal for removing dust and dirt from incoming collections. Kit includes a soft dusting brush, an upholstery screen, vacuum cleaner micro-tools, small polyvinyl alcohol sponges, nitrile gloves and a cleaning instruction booklet.
|
Museum Store Design
By Karl Hoerig
Store design is the second of the big three elements of retail success (along with personnel and merchandising). If you are lucky enough to be in the planning stages of your facility construction and have your architect's ear, you have some great opportunities to shape your store's physical layout. If your retail space is already built, there are always opportunities to improve design and to improve the space's function.
Retailers spend a lot of money on store design, seeking to create a memorable and unique "signature" store atmosphere. "Gap" stores all over the country (except maybe the one on U.S. 89 north of Cameron, AZ) have similar layout, look, and "feel." This isn't an accident. The stores are carefully designed to encourage their target audience to purchase the most merchandise possible.
Big retailers hire design firms and customer behavior researchers. We don't have the money to do this, but there are some lessons they can teach us.
Some basic considerations if you are starting from scratch:
1. Place the store where it's convenient for visitors: near the entrance, before the paid admission area, near the exhibit exits.
The store should be easy to get to for repeat visitors who don't want to see the exhibits, but just want to pick up that perfect gift. In spite of our best hopes, some visitors just aren't interested in spending time (and money) to enjoy exhibits, but will want to shop. Easy access to the store from exhibit exits allows visitors who have been inspired by your museum to shop and learn more.
Many larger museums place multiple mini-stores throughout their facility, matching merchandise to surrounding exhibits. Some museums also create special shops that relate directly to traveling shows, often forcing visitors to walk through the shops to exit the exhibit. The goal is to make shops convenient for visitors, and available when their interest is at its peak.
2. Stores should be easy to enter and exit. Wide entries allow visitors and potential customers to see what's inside.
3. When designing your shop, be sure to allow room for visitors/customers to move around and see the merchandise. If people feel crowded, they will not stay in your shop as long, and will be less likely to buy.
Careful design will also allow space for a stock room--preferably an actual room close to your sales space--and a place for shop office management.
4. Flexibility is good: You should have the ability to easily change your display layouts, to move merchandise, and modify your fixtures to fit changing merchandise over time. Repeat visitors will stop visiting if they perceive your shop to be the same every visit. Even if your inventory doesn't change much, displaying it differently will allow these important repeat customers to see the merchandise differently.
5. That brings us to the next design guideline: creating your store's ambiance.
As I noted before, big retailers spend a lot of money to be unique. The Gap doesn't want to be the same as Abercromby and Fitch, and vice versa. If customers perceived them to be interchangeable, they would lose business to each other and to other retailers.
With a museum shop you have the opportunity to go one step further: you can create a unique shopping experience that ties your shop to your museum and heightens your visitors' entire experience at your institution.
Increasingly, museum stores are recognizing the value of thematic association with their exhibits and programs, taking cues from other entertainment venues like Disneyland, with its Indiana Jones™ Outpost and Pooh Corner and "it's a small world" Toy Shop and Little Green Men Store Command and ... you get the idea.
In considering design for your museum store, are there themes or events that would be appropriate to create an experience for your shop visitors, an environment unique from other stores they might visit?
A powwow trader's tent?
A festival?
Another trading event?
By utilizing floor, wall, and ceiling coverings; photos and props; and fixtures you can use design to set a mood that will make your store stand out.
By creating an immersive, out-of-the ordinary experience for shoppers, they will spend more time in your shop, and thus will be more likely to purchase. They will also remember the shopping experience, which has several benefits for you:
1. They will ascribe more meaning to the items purchased at your shop, because they come with the story of your shop's environment;
2. They will be more likely to return;
3. They will be more likely to tell their friends.
Excerpt from MS254: Retail Store Management for Small Museums.
Karl Hoerig is director of Nohwike' B�gowa (House of Our Footprints), the White Mountain Apache Cultural Center and Museum, in Fort Apache, Arizona. The position requires multifaceted involvement in the community, a mix of museum tasks, heritage promotion, cultural heritage resource protection and management, capacity building, economic development and enhancing sovereignty. Karl Hoerig has a PhD in anthropology from the University of Arizona.
|
Regional Workshops
Where you can find some of our instructors this year:
Gawain Weaver
The Care and Identification of PhotographsAdvanced Photograph Conservation Workshops
- October 21-24, 2013 (Huntington Library, San Marino, CA)
Steve Layne
Certified Institutional Protection Manager
- March 10, 2013, The Midwest Security Conference, Lisle, IL
- May 18, 2013, AAM Annual Meeting, Baltimore, MD
IFCPP Conference
- August 3-7, 2013, San Diego, CA
Helen Alten
Disaster Preparedness Workshop
- June 14-15, 2013, Athens, Greece.
Collections Management and Practices
- July 11-12, 2013, Bryn Mawr College, Bryn Mawr, PA, $270 AASLH members/$345 nonmembers. $40 discount if fee received by June 5.
|
|
|
Welcome to the Collections Caretaker e-Newsletter from Northern States Conservation Center. The newsletter is designed to bring you timely and helpful content that is pertinent to situations we all encounter in our museum and archives work. Feel free to let us know what topics you would like to see featured in Collections Caretaker or even contribute an article.
|
|
Photographs Defined
by Gawain Weaver IntroductionPhotographs are among the most common objects in modern society. But think for a moment how you care for photos. Are your personal snapshots - the photographic record of your family's history - kept in acid-free portfolios stored in climate-controlled rooms? Probably not. Unfortunately, that's often the case with photographs held by museums, archives, and libraries, too. But before delving into how photographs should be stored, we must begin with photographic technology. Anyone who is responsible for photographic collections should know what photographs are, how to identify specific processes and the materials used to construct prints. This foundation provides a broader, deeper understanding of how photographs age, how to combat aging, and the principles behind environmental and handling guidelines for photograph collections. Photographs DefinedA photograph is not an image. Rather, it's an object that contains an image. It has layers of materials. We can speak generically about the structure of photographs using these terms: support, binder and final image material. Although the structure can be more complex, these three are a good place to start. Understanding the various layers in a completed photograph and how they relate to each is vital to caring for photographs. A cross-section helps understand these layered structures. Cross-sections will always be displayed with the image layer on top and the support below. SupportJust as every house needs a foundation, every photograph must have a base. What we'll refer to as the support layer provides that base. As other layers are attached, it provides rigidity, flexibility and strength for every photograph. The support layer also can add optical properties such as transparency or reflectivity. Numerous support materials have appeared and disappeared - sometimes only to return - throughout the history of photography. The most common are paper, glass and plastic. Each has physical or optical advantages and disadvantages, and each displays certain types of deterioration. Paper, for instance, has been used since the beginning, first as a support for negatives and prints by William Henry Fox Talbot and later as a support for albumen prints from 1855-85. Paper again turned up as a support for gelatin silver prints and chromogenic color prints until 1970. It also has been used for a variety of other processes, including platinotypes, cyanotypes, matte collodion prints and others. Metal served as a support for the daguerreotype from 1840-1855, and then again for the tintype (despite the name, tintypes relied on iron) from 1856-1920s. Glass was used for wet plate collodion negatives (1851-1880), ambrotypes (1855-1860), and gelatin dry plates (1880-1925). Plastic, which includes cellulose nitrate, cellulose acetate and polyester, has been used since 1889 for black and white negatives and since the 1930s for color film. It was used for some color prints in the 1940s and '50s. A variant of the solid plastic support was resin-coated or RC paper, which was introduced in 1968 for color and black & white printing papers. The RC support consists of a sheet of paper sandwiched between two thin layers of polyethylene. Leather, cloth, and ceramic have also been used, but they were not commercially important. BinderThe binder holds the final imaging substance to the support. Though it's sometimes called an emulsion, that term refers solely to gelatin-based binders during manufacture. I prefer the term binder or image layer. Not all photographs have binders. While a number of binders have been used, gelatin, albumen and collodion are the most common. Gelatin does not occur naturally; it's derived from collagen extracted from the bones, skin and hides of cattle. Gelatin has many qualities that make it an ideal photographic binder: it's tough, resists abrasions when dry, and swells in water, allowing processing chemicals to penetrate. Not surprisingly, gelatin has been the dominant photographic binder since the 1880s. Albumen - egg whites - and collodion - cellulose nitrate dissolved in alcohol and ether - preceded gelatin. Final Image MaterialThe final layer forms the image after exposure and processing - when the photograph is completed. It is often held in a binder. Though silver has been among the most common materials used for what we'll call the final image material, it is not the only option. So why do we call it the final image material? Why not just image material? Well, because the light sensitive substance in the photograph before processing is often dramatically different from the final image material. For example, a chromogenic color print starts out with a silver-based light-sensitive imaging material, but the final print contains only color dyes. The silver is removed during processing. Platinum prints start out as iron and platinum salts, but finish with only platinum. Likewise, cyanotypes begin as two iron salts and finish as one (blue) iron complex. Carbon prints begin as a layer of gelatin with pigment and finish that way. Finally, gelatin silver prints (also known as black and white prints) start as silver halide crystals and finish as metallic silver. Each final image material has a particular weakness. This helps determine the best way to care for a particular photograph. The construction of each type of photograph affects its permanence, or, conversely, causes its deterioration.
Excerpt from MS222: Care of Photographs.
For information on recent image printing, see A Consumer Guide to Modern Photo Papers, January 2009, Image Permanence Institute.
Gawain Weaver teaches international workshops on photograph conservation and preservation. He earned his master's degree in art history and conservation from New York University's Institute of Fine Arts and was a fellow at the George Eastman House and Image Permanence Institute for two years. His interest in photograph conservation included studying at Library and Archives Canada, the Amon Carter Museum, the Museum of Modern Art, and the Northeast Document Conservation Center. For more information visit his web site Gawain Weaver Art Conservation.
|
Staff Health and Safety During Museum Cleaning
By Gretchen Anderson
A small museum had a collection of 50 taxidermy heads mounted on the wall. The collection was a gift in the 1920s from a great benefactor of the museum who loved big game hunting in Africa. A technician dutifully cleaned the specimens a few times per year, whenever they seemed to be really dusty. After a few years of this she began having health problems. After cleaning the specimens her face would feel numb. Other symptoms appeared, and were eventually associated with low-level arsenic exposure.
 | | Arsenic on owl feathers shows as tiny white specks on a specimen at the Alaska State Museum. |
Poisonous Collections
Many collections have been treated for pesticides, or have been prepared with poisons. For many years, taxidermy was prepared with a paste of arsenic or other heavy metals as part of the curing process. Most of the time the poison was applied to the interior of the skin. However, if your collection has old taxidermy with cracks in it, and white powder sifting out, then get it tested. Make sure that arsenic levels are below federal standards. Wear personal protective equipment when working with the specimen.
This is only one example. In natural history collections, there are many things that are poisonous. Fluid collections are prepared with formaldehyde and ethanol; insect collections are usually laced with paradicholorobenzine (PDB) or napthalene (mothballs). Ethnographic collections have been poisoned by every known pesticide. There is a lot of research being done on pesticides and what kind of residues they leave (1).
If you don't know the history of care at your institution, then assume the collections have been treated with a poison in the past and ALWAYS wear protective clothing when handling or cleaning items. Pesticide treatments were not considered important enough to document. They were on a par with washing windows - something done regularly as part of the museum's daily existence. Whole storage rooms were sprayed regularly, often without regard to whether the items were organic or not. Some museums have found that geology, ethnology and storage shelves are all equally contaminated. Also, if the museum didn't treat something with a poison, a collector or donor might have done so before it entered the museum. There are stories of trainloads of artifacts being fumigated before they were donated to East Coast institutions. Until very recently, these residual poisons included DDT, lead dust, arsenic, mercury... the list is long.
And to make it even more dangerous for the collections care professional - some of the collections are inherently deadly. The Science Museum of Minnesota, working with research associate Rose Kubitaowitz, has begun a database, Oh No! Ethnobotany, for ethnographic (and biological) collections that are poisonous. Would you believe that 60 year old curare, used on the tips of poison darts, is still active? It is! There is a pretty little seed called the Prectatory pea that shows up on necklaces from South America. Do not put this in your mouth! It is a deadly poison.
Respiratory Problems
Make sure that the cleaning technique you use doesn't push settled dust back into the air. (Many vacuum cleaners spray fine dust particles out the back end.) Airborne dust is an irritant and can cause lung disease. Dust worsens hay fever. Dust contains a wide range of material from cellulose to inorganic particles from the building. If the building is older, dust might contain asbestos, lead from old paint or other substances that you do not want to breath in. For this reason, I recommend high filtration - HEPA or ULPA - vacuum cleaners.
Insects and other small fauna found in houses have their own subtle interactions with dust that may have adverse impact on the health of its regular occupants. Thus, in many climates it is wise to keep a modicum of airflow going through a house, by keeping doors and windows open or at least slightly ajar. In colder climates, it is essential to manage dust and airflow, since the climate encourages occupants to seal even the smallest air gaps, and thus eliminate any possibility of fresh air entering.
House dust mites are on all surfaces and even suspended in air. Dust mites feed on minute particles of organic matter, the main constituent of house dust. They excrete enzymes to digest dust particles; these enzymes and their feces, in turn, become part of house dust and can provoke allergic reactions in humans. Dust mites flourish in the fibers of bedding, furniture, and carpets. This is why it is important to clean throughout the museum on a regular schedule.
A few years ago, OSHA classified ALL MOLD as potentially toxic. For any work with mold - on collections or in rooms - you must wear proper protective clothing and respirators. Mold can cause severe respiratory ailments and even sudden death.
Mold growth is encouraged by warm and humid conditions. It is likely to grow and become a problem where there is water damage, high humidity, or dampness. It is estimated that about 50 to l00 common indoor mold types have the potential for creating health problems. Exposure to molds can cause symptoms such as nasal stuffiness, eye irritation, or wheezing. Some people, such as those with serious allergies to molds, may have more severe reactions.
Proper Protection
Always be aware of the dangers to yourself and your staff while handling collections. Wear proper personal protective equipment (PPE) specific to the danger. Have a good supply of nitrile disposable gloves (2) on hand. Get the ones that are powder free (powder can abrade objects and leave unsightly residues). Nitrile gloves will protect you from any residues that can be absorbed through the skin.
Have access to a properly fitting respirator with disposable filters. Check to see what is appropriate for you and for your situation. Do not depend on paper disposable filters for much beyond nuisance dust. Follow the respirator directions closely, otherwise your precautions are useless. If you wear a beard or mustache you will have to use a full-face respirator.
Wear disposable Tyvek suits if you are cleaning in areas with known hazards - such as a taxidermy hall. Remove the suits as you leave the area, turning them inside out and sealing them in a plastic bag for hazardous waste disposal.
It is better to wear disposable aprons and gloves rather than white cotton lab coats and cotton gloves. But if you do use the cotton clothing, then don't wash it in machines used by families. Ideally, have a washing machine at the museum that you can use for fabric that might contain heavy metals.
Cleaning Chemicals
As a student I worked for the food service at my college. One of my many jobs was to clean the vending machines. I was given a bucket, rags, scrubbers and cleaning chemicals. I was not given gloves, a respirator or an apron. I would open the machine, scrub it clean and fill it with what ever was needed. After doing this for 3 months I developed a chemical burn on my arms. It took 6 months for it to completely heal, with years of eczema out breaks. I still have the scars. And to this day I am extremely sensitive to any kind of cleaning chemical.
Cleaning solvents are not safe to use without good airflow. I remember how shocked I was to find a registrar cleaning the silver collection in the museum basement, with no respirator and no fume extraction or fresh air supply. He was using a rubbing alcohol paste recommended by their consulting conservator and complained of headaches. No wonder. He was asphyxiating himself. If you become dizzy or get a headache, leave the area immediately and rethink your procedure. You aren't being safe. Any cleaner that smells probably contains solvents that can harm you if they build up in an enclosed space. Cleaning with solvents should occur in a fume hood or where there is a good flow of fresh air. For general museum cleaning, stick with distilled water misting and other water- based cleaners. Note that even organic cleaning products can be damaging to your health and to the collection. Orange or lemon cleaners are effective because of their pH and enzymes - they can pose health hazards and react adversely with object surfaces. Finally, the cleaning chemicals themselves might contain something that is dangerous.
Notes
(1) The best publication about poisons on collections is: Nancy Odegaard, A Sadongei and Associates, Old Poisons, New Problems: A Museum Resource for Managing Contaminated Cultural Materials, AltaMira Press, 2005.
Nancy Odegaard also teaches the online course MS 255: Dangerous Materials: Chemical Poisons in Collections.
(2) Many people are allergic to latex gloves. Many chemicals pass through latex easily, so it does not provide good chemical protection. Nitrile gloves are safer. Unpowdered nitrile gloves are hypoallergenic and provide the best chemical protection of any of the plastic gloves.
Excerpt from Ms 217: Museum Cleaning Basics.
Objects conservator Gretchen Anderson learned her craft at the American Museum of Natural History, the Smithsonian's Conservation Analytical Lab, the Canadian Conservation Institute, Getty Conservation Lab, the Los Angeles County Museum of Art, and the Minnesota Historical Society. She established the conservation department at the Science Museum of Minnesota in 1989. She is the co-author of A Holistic Approach to Museum Pest Management, a technical leaflet for the American Association for State and Local History and established a rigorous IPM program for the Science Museum. She was a key member in the planning team that designed and built a new facility for the Science Museum of Minnesota.This endeavor resulted in not only a state of the art exhibition and storage facility, but also a major publication about the experience of building a new museum and creating the correct environments: Moving the Mountain. In 2009 she accepted the position of conservator and head of the conservation section at the Carnegie Museum of Natural History in Pittsburgh. Ms. Anderson is a member of the American Institute for Conservation and the Society for the Preservation of Natural History Collections. She lectures and presents workshops on preventive conservation, IPM, cleaning in museums, and practical methods and materials for storage of collections. |
Handling Birds
by Helen Alten
The skin on taxidermy bird mounts is often thin and brittle. Handle at the wood or plaster base and do not touch the bird itself if you can avoid it. Too much pressure on the skin will crack it. Remember to wear nitrile gloves, a toxic dust respirator and a disposable apron or Tyvek suit to protect yourself from poisons.
See Conserve-O-Gram 11/9 Handling and Care of Dry Bird and Mammal Specimens ( http://www.nps.gov/museum/publications/conserveogram/11-09.pdf ) for more details on handling bird specimens.
Helen Alten, Director of Northern States Conservation Center, teaches the online course MS224: Care of Leather and Skin Materials.
|
Northern States Conservation Center (NSCC) provides training, collection care, preservation and conservation treatment services. NSCC offers online museum studies classes at www.museumclasses.org in Collections Management & Care, Museum Administration & Management, Exhibit Practices and Museum Facilities Management.
Sincerely,
Helen Alten, DirectorBrad Bredehoft, Sales and Technology Manager Peggy Schaller, Publications Manager
|
|
|
|
|
|
|